
“Crunch! That satisfying sound of crispy goodness brings back memories of my first sushi-making adventure. Today, I’m excited to share my take on the Crispy Chicken Tempura Roll: Crunchy Sushi, an easy and delightful dish that transforms ordinary ingredients into extraordinary flavors in just 30 minutes. This recipe is perfect for family gatherings or cozy nights in, as it offers a budget-friendly way to indulge in Japanese cuisine without the pricey restaurant bill. Plus, with the option to customize with shrimp or tofu, there’s something for everyone to enjoy! Are you ready to roll up your sleeves and create sushi magic at home?”
Why Make Chicken Tempura Rolls?
Ease of Preparation: This recipe comes together in just 30 minutes, making it simple for any home cook to master.
Crispy Goodness: The combination of fried chicken and sushi rice delivers an irresistible crunch that will impress your family and friends.
Versatile Options: Looking for variety? You can easily swap chicken for shrimp or use tofu for a delightful vegetarian twist.
Family-Friendly: Perfect for picky eaters, this dish can cater to everyone’s tastes, making meal prep a breeze.
Budget-Savvy: Enjoy gourmet sushi flavors without breaking the bank. Paired with sides like Crockpot Chicken Nachos, your family will feel spoiled!
Crowd-Pleaser: Whether it’s a casual dinner or a fun sushi night, these rolls are sure to be a hit!
Chicken Tempura Roll Ingredients
• Get ready to whip up some crispy sushi magic!
For the Sushi Rice
- Short-Grain Rice – This is essential for that sticky sushi texture; Calrose or Nishiki are ideal choices.
- Cold Water – Helps in cooking the rice perfectly; be sure it’s cold for best results.
- Rice Vinegar – Used to season the rice; mix with sugar and salt for balanced flavors.
- Sugar – Adds a touch of sweetness to enhance the rice seasoning.
- Salt – Essential for boosting the overall flavor of both the rice and chicken.
For the Chicken Tempura
- Chicken Breasts – Main protein source, delivering succulent flavor; slice against the grain for extra tenderness.
- Plain Flour – Used for coating the chicken, ensuring a delightful crunch.
- Corn Flour (Cornstarch) – Enhances the crispiness of the chicken coating when fried.
- Neutral Cooking Oil – Required for frying; heat to 350°F (175°C) for perfect frying conditions.
For the Sushi Rolls
- Nori Sheets – The seaweed wrapper that holds all the delicious ingredients together.
- Ripe Avocado – Adds creaminess and richness; mango can be a sweeter alternative if you prefer.
- Sesame Seeds – Optional garnish that elevates the flavor and presentation of your rolls.
These ingredients help create the perfect Chicken Tempura Roll: Crunchy Sushi experience that everyone will love!
Step‑by‑Step Instructions for Chicken Tempura Roll: Crunchy Sushi
Step 1: Rinse the Rice
Rinse 2 cups of short-grain rice under cold water until the water runs clear, which usually takes about 2-3 minutes; this removes excess starch for a better texture. Drain the rice well in a colander and set it aside as you prepare the next steps for your Chicken Tempura Roll: Crunchy Sushi.
Step 2: Cook the Rice
In a medium saucepan, combine the rinsed rice with 2.5 cups of cold water and bring to a boil over medium-high heat. Once boiling, reduce the heat to low, cover the pot, and simmer for 12 minutes. After the time is up, remove it from heat and let the rice steam, still covered, for an additional 10 minutes to achieve the perfect sushi texture.
Step 3: Season the Rice
In a small bowl, mix together 3 tablespoons of rice vinegar, 1 tablespoon of sugar, and 1 teaspoon of salt until dissolved. Once the rice has finished steaming, transfer it to a large bowl and gently fold the vinegar mixture into the warm rice using a wooden spatula. Be careful not to mash the rice; you want to maintain its fluffy texture for the Chicken Tempura Roll.
Step 4: Prepare Chicken
While the rice is cooking, slice 2 chicken breasts into thin strips, about 1 inch wide. Season the chicken pieces with salt and pepper on both sides, allowing the flavors to penetrate for a few minutes. This seasoning step is vital for enhancing the taste of your crispy chicken in the Chicken Tempura Roll: Crunchy Sushi.
Step 5: Set Up Coating
Prepare your coating station by placing plain flour in one bowl and cornstarch in another. Add a pinch of salt and pepper to the flour for extra flavor. This setup will make coating your chicken strips quick and easy; be ready to create some deliciousness for your Chicken Tempura Roll.
Step 6: Heat Oil
In a deep skillet, heat 2-3 cups of neutral cooking oil to 350°F (175°C). Use a kitchen thermometer for accuracy, ensuring the oil is hot enough to achieve a crispy texture without soaking the chicken. This step is crucial for perfect frying and enhances the overall experience of your Chicken Tempura Roll: Crunchy Sushi.
Step 7: Fry Chicken
Once the oil is ready, coat the chicken strips first in flour, shaking off any excess, and then dip them into the cornstarch for that crunchy exterior. Fry the coated chicken pieces in the hot oil in batches for 3-4 minutes or until they turn golden brown and crispy. Use a slotted spoon to transfer the chicken to a wire rack to drain while you finish frying the rest.
Step 8: Prepare Nori
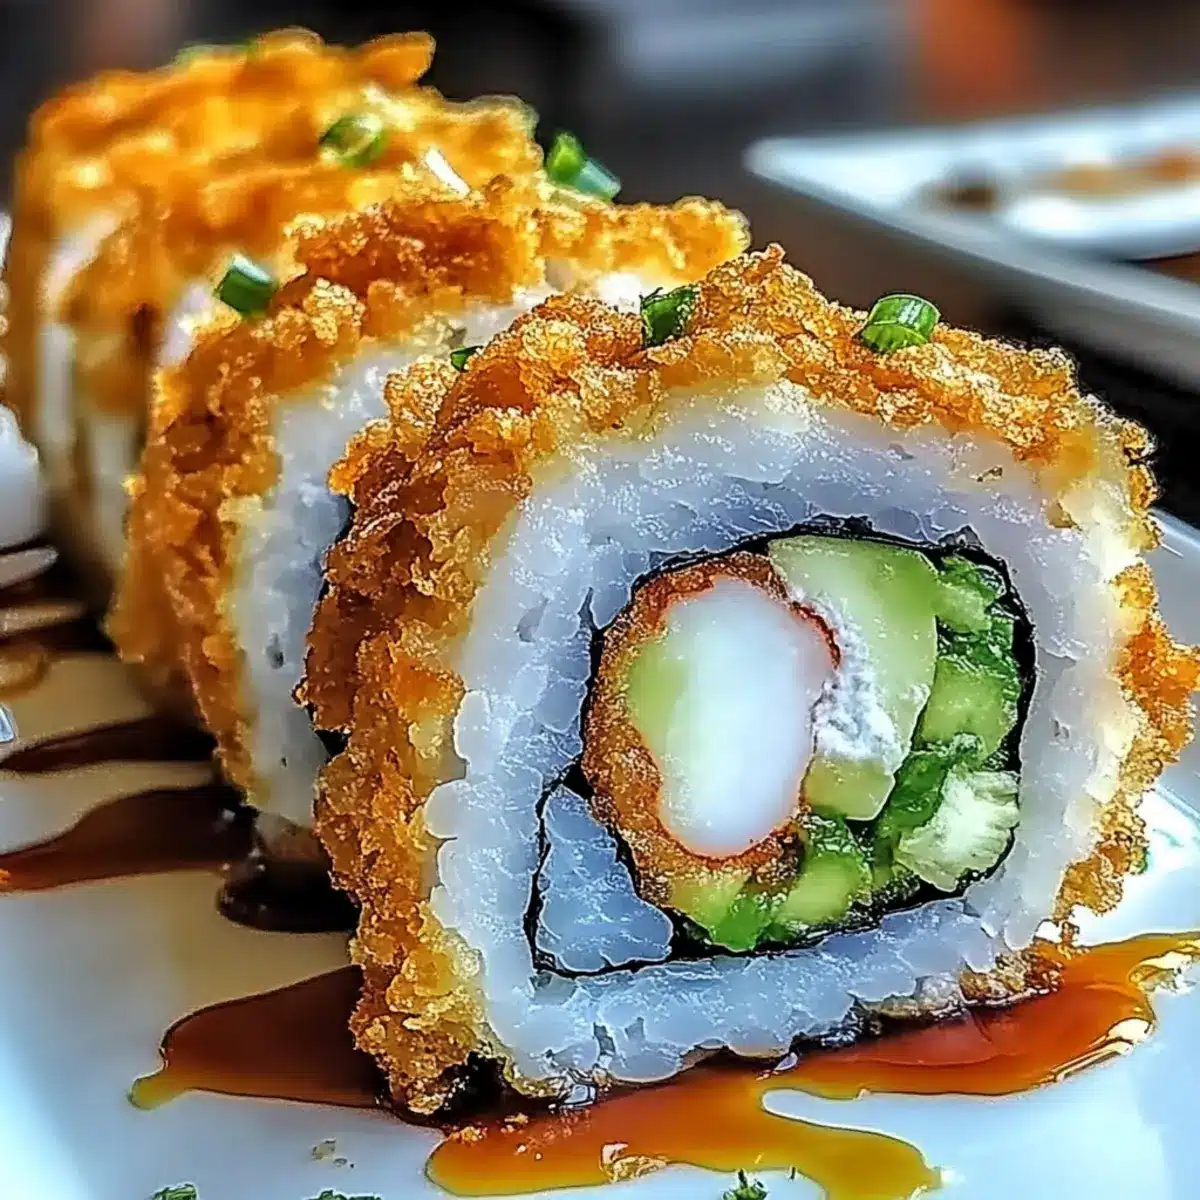
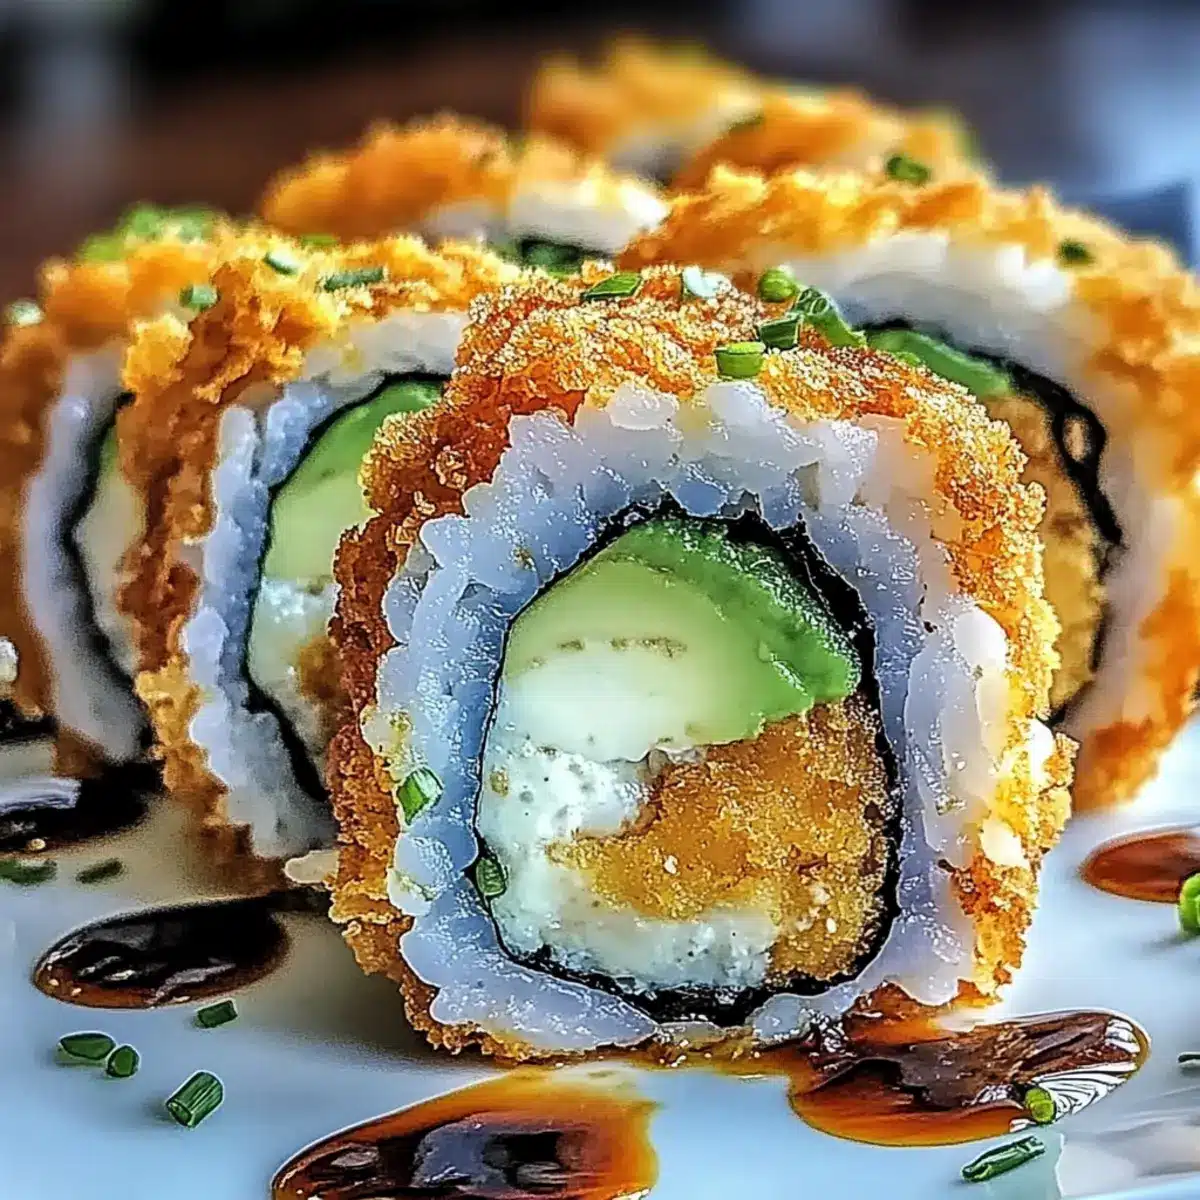
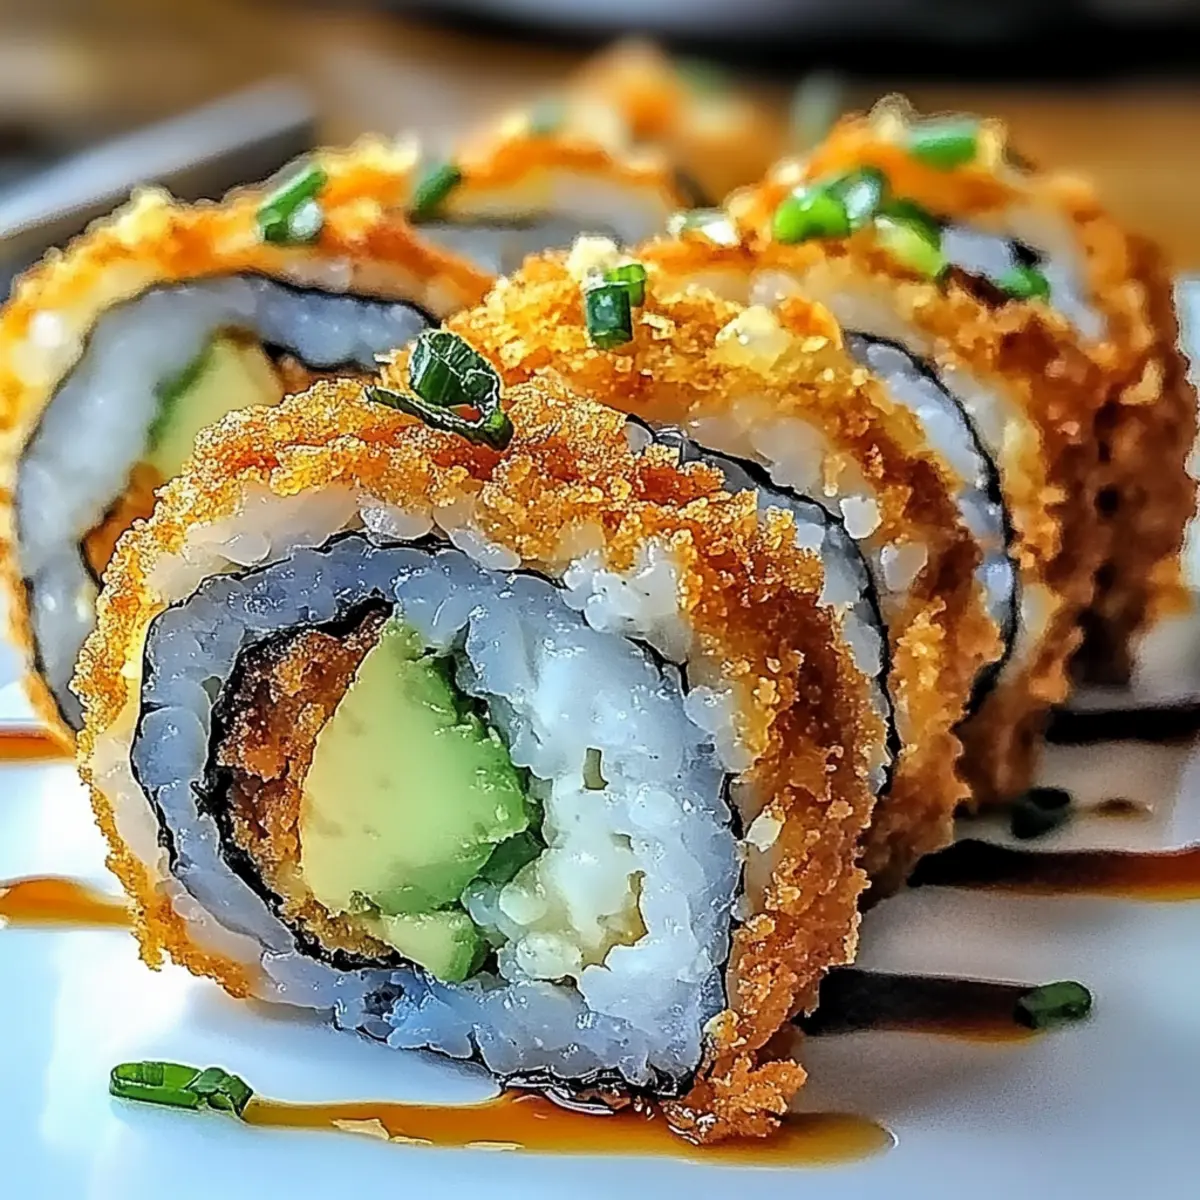
Lay a sheet of nori, shiny side down, on a bamboo sushi mat. Spread an even layer of the seasoned sushi rice over the nori, leaving a 1-inch border at the top edge to facilitate rolling later. This foundation holds your Chicken Tempura Roll together, ensuring every bite is packed with flavor.
Step 9: Add Filling
Position the crispy chicken strips and slices of ripe avocado horizontally across the rice, about an inch from the bottom edge. Feel free to customize this step with any extra ingredients like cucumber for added crunch. The vibrant colors and textures will make your Chicken Tempura Roll visually appealing.
Step 10: Roll Sushi
Begin rolling the mat away from you, applying gentle pressure to form a tight roll. Wet the bare edge of the nori with a little water to help seal the roll. Carefully lift the mat to shape the Chicken Tempura Roll, ensuring all the delicious fillings stay snugly wrapped inside.
Step 11: Slice and Serve
Using a sharp, wet knife, slice the roll into 8 equal pieces, wiping the knife clean between cuts for neat edges. Arrange your beautiful Chicken Tempura Roll pieces on a serving platter. Pair with soy sauce, wasabi, or spicy mayo for dipping, and enjoy a delightful sushi experience at home!

Expert Tips for Chicken Tempura Rolls
-
Oil Temperature Matters: Ensure your oil reaches 350°F (175°C) before frying; a thermometer is your best friend here for a crispy chicken tempura roll.
-
Avoid Overcrowding: Fry in batches rather than crowding the pan, which can lower oil temperature and lead to soggy chicken.
-
Ice Water Trick: For an extra crispy exterior, dip chicken strips in ice water before coating them in flour—this change can make all the difference!
-
Rice Preparation: Rinsing the rice until the water is clear is crucial for the right sushi texture; it eliminates excess starch that can lead to gummy rice.
-
Fluffy Rice Warning: Gently fold the vinegar mixture into the rice to maintain fluffy texture; avoid mashing it for the best results in your chicken tempura roll.
-
Customize with Ease: Feel free to experiment with fillings; adding cucumber or tofu gives your sushi rolls a unique twist while keeping it budget-friendly!
What to Serve with Crispy Chicken Tempura Roll
Transform your sushi night into a feast by choosing the perfect sides and drinks that complement the crispy, flavorful goodness of your rolls.
- Soy Sauce Dipping: A classic choice that adds umami depth, enhancing the flavors of your sushi with each bite.
- Spicy Mayo: This creamy, zesty sauce adds a delightful kick that contrasts beautifully with the crispy chicken.
- Cucumber Salad: Refreshing and crunchy, this salad provides a light, crisp texture that balances the richness of the tempura.
- Miso Soup: A comforting, warm side that brings a soothing earthiness to your meal, enhancing the overall Japanese dining experience.
- Pickled Ginger: This tangy, sweet condiment cleanses the palate between bites, brightening the meal and adding complexity.
- Edamame: Steamed and lightly salted, these tasty pods offer a healthy, protein-rich snack that pairs well with sushi.
- Green Tea: This refreshing beverage complements the flavors of your meal while adding a light, aromatic contrast of its own.
- Mochi Ice Cream: For a sweet finish, this chewy dessert provides a delightful contrast to your crispy chicken tempura rolls.
- Fruit Platter: A colorful assortment of tropical fruits like mango or pineapple adds a fresh, vibrant touch to your meal.
- Sake: For the adventurous, a chilled glass of sake enhances the Japanese theme and elevates your home sushi experience.
How to Store and Freeze Chicken Tempura Rolls
Fridge: Store leftover Chicken Tempura Rolls in an airtight container for up to 24 hours to maintain freshness and prevent sogginess.
Freezer: For longer storage, wrap the rolls tightly in plastic wrap and place them in a freezer-safe bag. They can be frozen for up to a month.
Reheating: To achieve the best texture when reheating, place frozen rolls in an oven or air fryer at 350°F (175°C) for about 10-15 minutes until warmed through.
Serving Tip: Enjoy your crispy chicken tempura roll hot, paired with soy sauce or spicy mayo for a delightful experience!
Chicken Tempura Roll: Customization Options
Feel free to explore exciting twists and swaps for your Chicken Tempura Roll, creating a sushi masterpiece that suits your taste!
-
Shrimp Option: Substitute the chicken with juicy shrimp for a delightful seafood variation. Simply coat and fry as you would with chicken for that crispy goodness.
-
Tofu Delight: Opt for firm tofu instead of chicken for a vegetarian version. Marinate the tofu in soy sauce and sesame oil for an extra flavor boost.
-
Fresh Veggies: Add a crunchy twist by incorporating thinly sliced cucumber or bell peppers inside the roll. They provide a refreshing contrast to the fried elements!
-
Spicy Kick: Want some heat? Drizzle Sriracha or add a dash of wasabi to your fillings for an exhilarating punch.
-
Air-Fried Chicken: For a healthier option, air fry the coated chicken strips instead of deep frying. You’ll still achieve a crispy texture with less oil!
-
Sweet Swaps: Replace avocado with ripe mango for a sweeter flavor profile in your roll that works beautifully with the savory chicken.
-
Flavorful Sauces: Experiment with different sauces for dipping, like tangy ponzu or creamy spicy mayo, to elevate your tasting experience even further.
Feel inspired to mix, match, and create the perfect Chicken Tempura Roll that resonates with your family’s preferences! Enjoy exploring other delicious meals, like Crockpot Balsamic Chicken or a quick Garlic Chicken Fried Rice for more family favorites!
Make Ahead Options
These Crispy Chicken Tempura Rolls are fantastic for meal prep, allowing you to enjoy sushi night with ease! You can prepare the sushi rice and fry the chicken up to 24 hours in advance. Simply store the cooked rice in an airtight container at room temperature (just avoid refrigeration to prevent it from hardening). Once you’re ready to serve, roll up the nori with your prepped chicken and avocado, slice, and enjoy your delicious Chicken Tempura Rolls! To maintain optimal quality, add the avocado fresh right before rolling to prevent browning. With these make-ahead options, you’ll save time on busy weeknights while still impressing your family with a homemade sushi experience!
Chicken Tempura Roll: Crunchy Sushi Recipe FAQs
How do I select the right avocado for my Chicken Tempura Roll?
Absolutely! Look for ripe avocados that gently yield to pressure when squeezed. The skin should be dark and smooth, without major dents or wrinkles. Avoid avocados with dark spots all over or a hard feel, as they might be underripe or overripe.
What’s the best way to store leftover Chicken Tempura Rolls?
I recommend placing your leftover rolls in an airtight container in the fridge for up to 24 hours. This keeps them fresh and prevents them from becoming soggy. Enjoy them cold or consider lightly reheating them in an oven for a slightly crispy texture.
Can I freeze Chicken Tempura Rolls?
Yes! For freezing, tightly wrap the rolls in plastic wrap, ensuring no air pockets, and then place them in a freezer-safe bag. They can be frozen for up to a month. When you’re ready to enjoy them, reheat in an oven or air fryer at 350°F (175°C) for 10-15 minutes.
What should I do if my fried chicken isn’t crispy enough?
Very! If you find your chicken isn’t getting that desirable crunch, check the oil temperature using a thermometer—ideally, it should be at 350°F (175°C). Also, avoid overcrowding the pan, as this can cause the oil temperature to drop. Fry in smaller batches for a better result.
Can I customize my Chicken Tempura Roll for dietary restrictions?
Certainly! You can substitute chicken with shrimp for a seafood twist or use firm tofu for a vegetarian option. If allergies are a concern, consider using gluten-free flour options for coating to accommodate dietary needs. Always check the labels for hidden ingredients.
How long can I keep the leftovers in the fridge?
Leftover Chicken Tempura Rolls can be stored in an airtight container in the fridge for up to 24 hours. For best results, enjoy them sooner rather than later, as the rice can harden and lose its original texture.
Chicken Tempura Roll: Crunchy Sushi You Can Make at Home
Ingredients
Equipment
Method
- Rinse the rice under cold water until clear, about 2-3 minutes. Drain well and set aside.
- Combine rinsed rice with cold water in a saucepan and bring to a boil. Lower heat and cover for 12 minutes, then let steam for 10 minutes.
- Mix rice vinegar, sugar, and salt in a bowl until dissolved. Fold the mixture into the steamed rice gently.
- Slice chicken breasts into thin strips and season with salt and pepper. Let sit to enhance flavors.
- Set up coating station with plain flour in one bowl and cornstarch in another, adding salt and pepper to the flour.
- Heat oil in a deep skillet to 350°F (175°C) using a thermometer.
- Coat chicken strips in flour and cornstarch, then fry in batches for 3-4 minutes until golden brown. Drain on a wire rack.
- Lay a nori sheet shiny side down on a bamboo mat, spread an even layer of sushi rice over it, leaving a 1-inch border.
- Place crispy chicken strips and avocado slices over the rice towards the bottom edge.
- Roll the mat away from you gently, using water to seal the edge of the nori.
- Slice the roll into 8 equal pieces with a wet, sharp knife and arrange on a serving platter.
Leave a Reply