
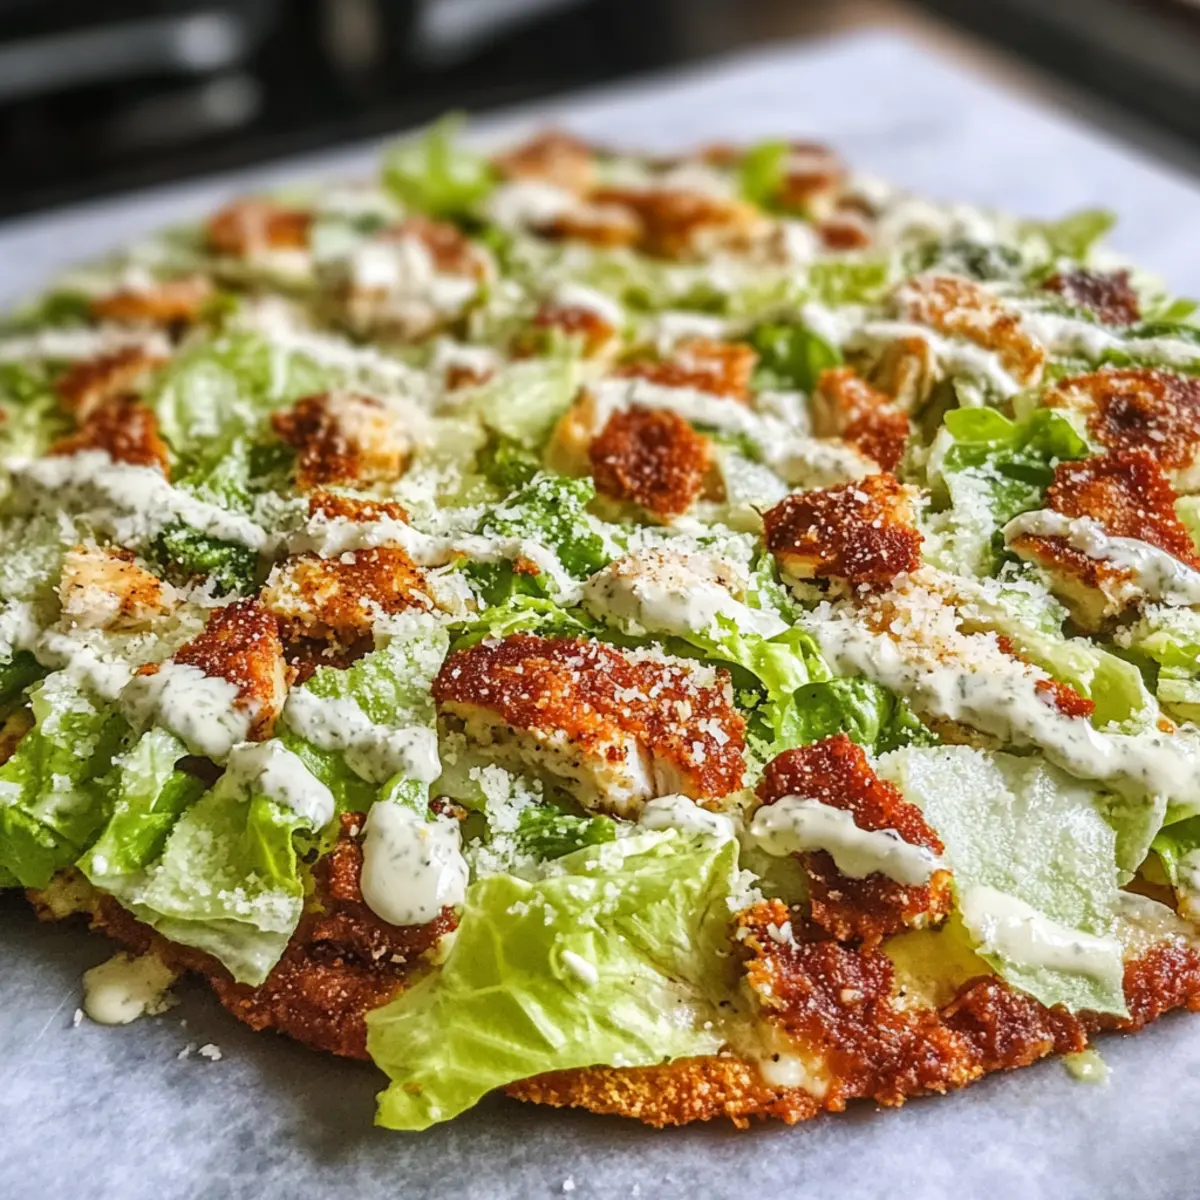
As I stood in my kitchen, a thrill of creativity struck—what if I combined two of my favorite dishes into one flavorful masterpiece? Enter the Chicken Crust Caesar Salad Pizza, a refreshing take on a classic that transforms a simple salad into a hearty meal. By using ground chicken as the base, I’ve crafted a low-carb delight that satisfies those pizza cravings without the guilt. Its crispy, protein-packed crust is not only delicious but also gluten-free, making it a perfect choice for anyone seeking satisfying, healthier options. Ideal for a quick lunch or light dinner, this innovative dish invites you to relish every crunchy bite of Caesar goodness on a savory foundation. Ready to explore a pizza that blends comfort and nutrition? Let’s dive in!
Why is this pizza so unique?
Innovative Twist: Combining a classic Caesar salad with pizza elevates both dishes into something truly special.
Healthy Indulgence: The chicken crust makes it a great low-carb, gluten-free option, perfect for those watching their diet without sacrificing flavor.
Crowd-Pleasing: It’s an exciting way to present a salad, making it appealing to everyone—kids and adults alike. Try pairing it with Garlic Chicken Fried Rice for a complete meal!
Quick and Easy: This recipe comes together in no time, perfect for those busy weekdays.
Texture Contrast: The crispy chicken base paired with crisp, fresh romaine offers a delightful combination that keeps your taste buds intrigued!
Chicken Crust Caesar Salad Pizza Ingredients
For the Chicken Crust
• Ground Chicken – The foundation of the crust; provides lean protein. Substitute with ground turkey to adjust flavor and texture.
• Shredded Mozzarella Cheese – Adds gooey goodness; opt for low-fat to lighten the dish, or try vegan cheese for a dairy-free option.
• Parmesan Cheese – Offers a salty, rich flavor; essential for an authentic Caesar pizza taste.
• Egg – Binds all ingredients and adds moisture; crucial for achieving the right texture in your crust.
• Italian Herbs – Infuses delicious depth; consider a mix of oregano and basil for a well-rounded flavor.
• Garlic Powder – Boosts flavor; fresh minced garlic makes a lovely substitute for added freshness.
• Salt & Pepper – Simple seasonings that enhance all flavors; adjust to your personal taste.
For the Caesar Salad Topping
• Romaine Lettuce – Provides a classic Caesar salad crunch; kale can be used for added nutrition, while mixed greens lend a milder taste.
• Caesar Dressing – Binds your salad together beautifully; try a yogurt-based version for a lighter take, or go homemade for that extra touch!
This Chicken Crust Caesar Salad Pizza brings a unique, guilt-free twist to your plate, perfect for a delightful meal that’s both satisfying and nutritious.
Step‑by‑Step Instructions for Chicken Crust Caesar Salad Pizza
Step 1: Preheat the Oven
Begin by preheating your oven to 400°F (200°C). To prepare for the Chicken Crust Caesar Salad Pizza, line a baking sheet with parchment paper, ensuring it’s ready for the crust. This step will make it easier to transfer the crust once it’s baked. The goal is to create a delicious, crispy base for our unique pizza.
Step 2: Prepare the Chicken Crust Mixture
In a large mixing bowl, combine ground chicken, shredded mozzarella, Parmesan cheese, egg, Italian herbs, garlic powder, salt, and pepper. Mix until the ingredients are fully incorporated and the mixture is not sticky. This flavorful mixture will serve as the foundation for your chicken crust. The aroma of the herbs and seasonings will be enticing!
Step 3: Shape the Crust
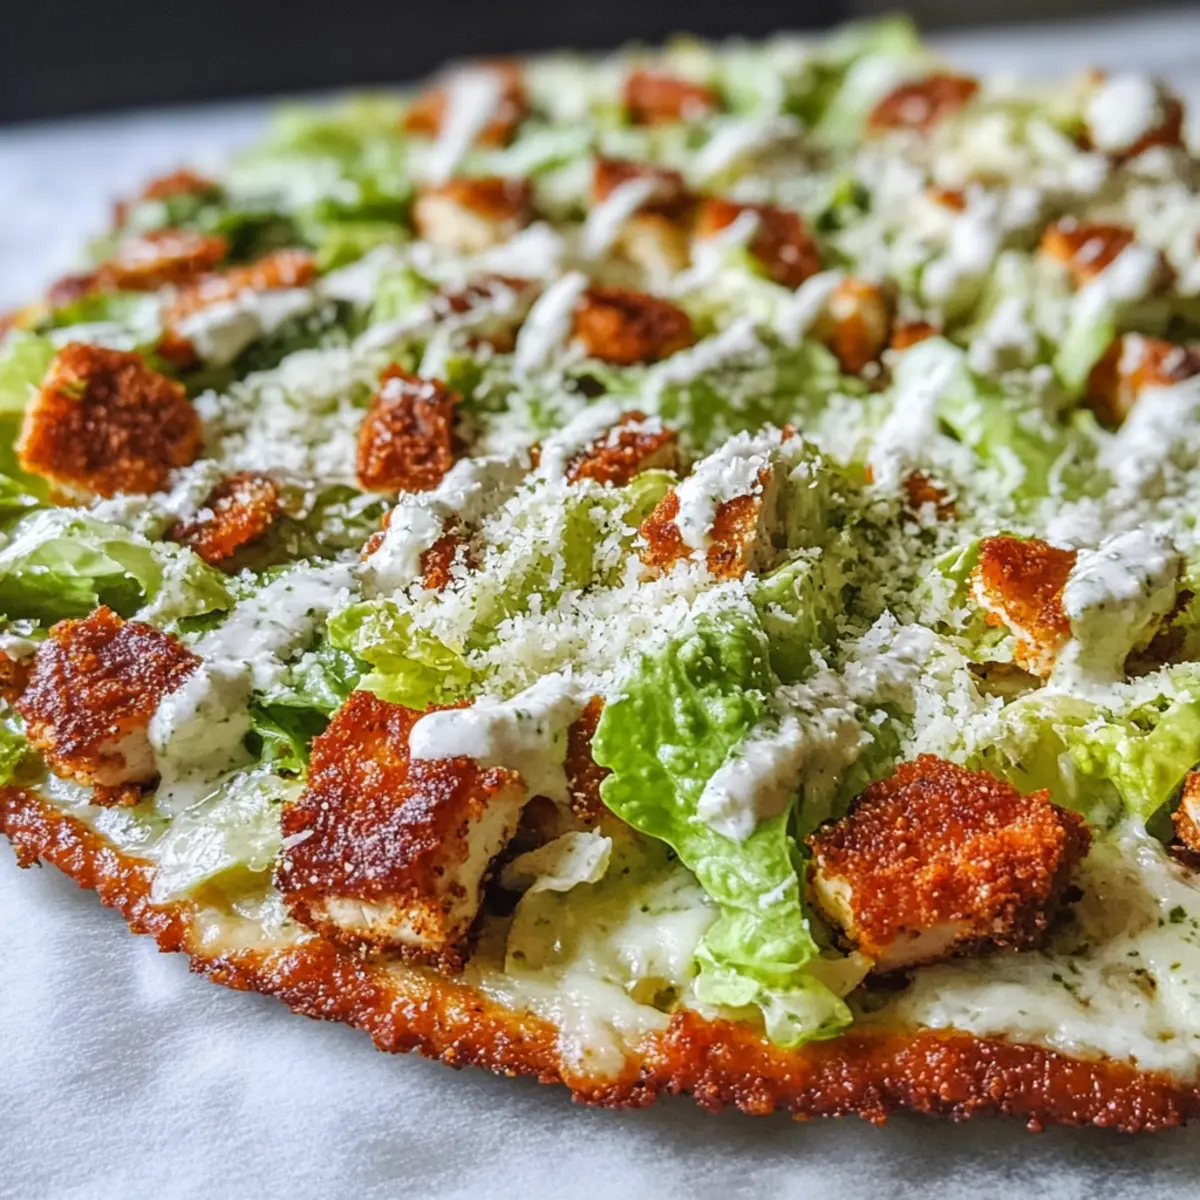
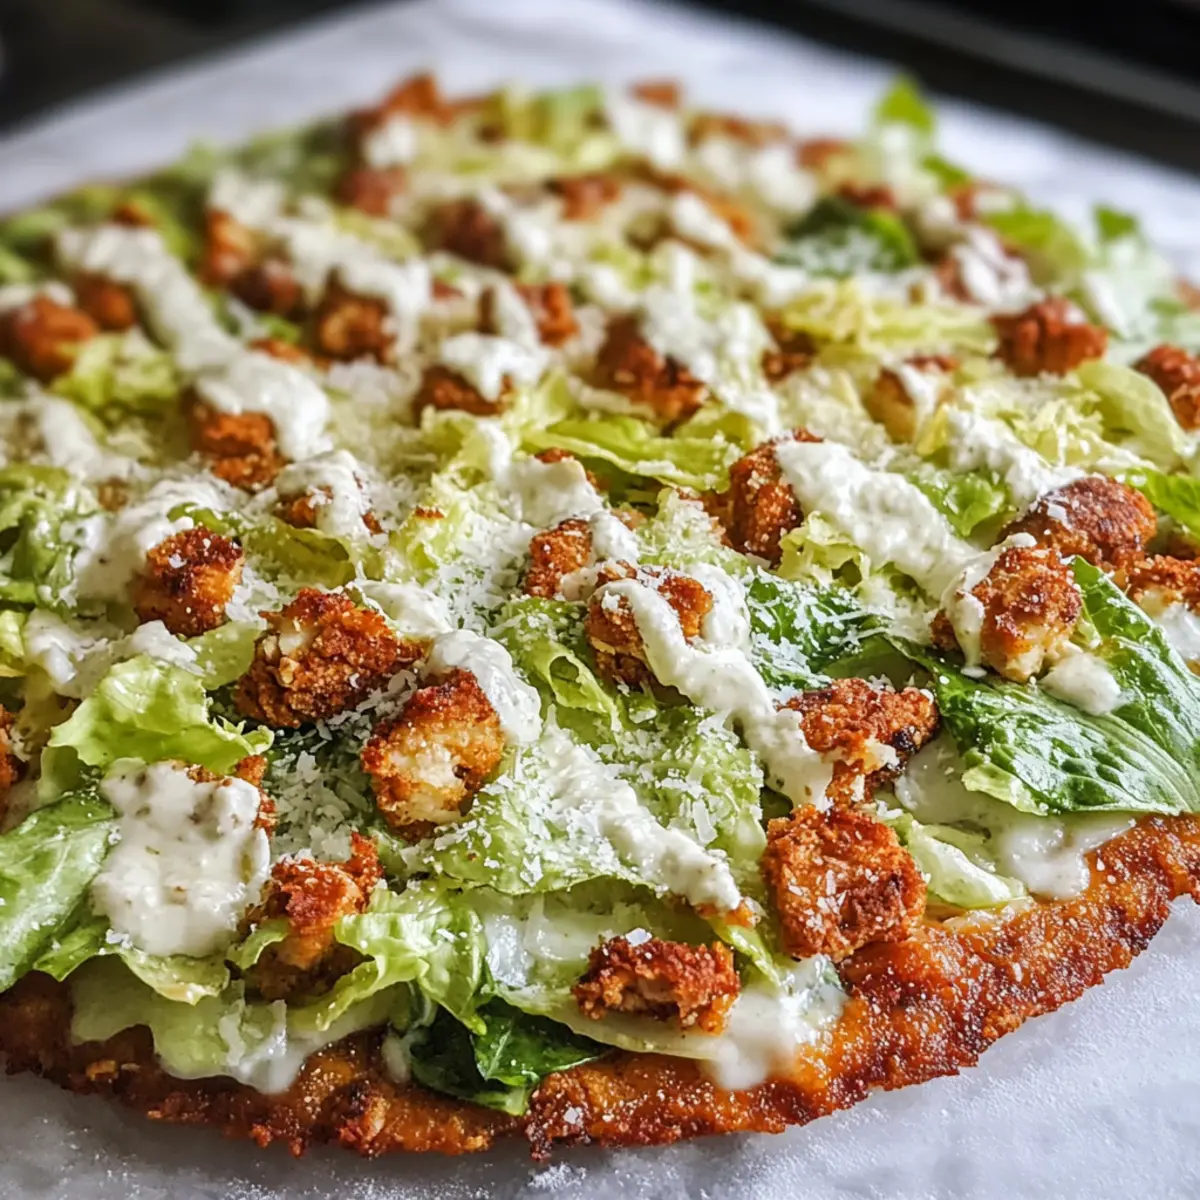
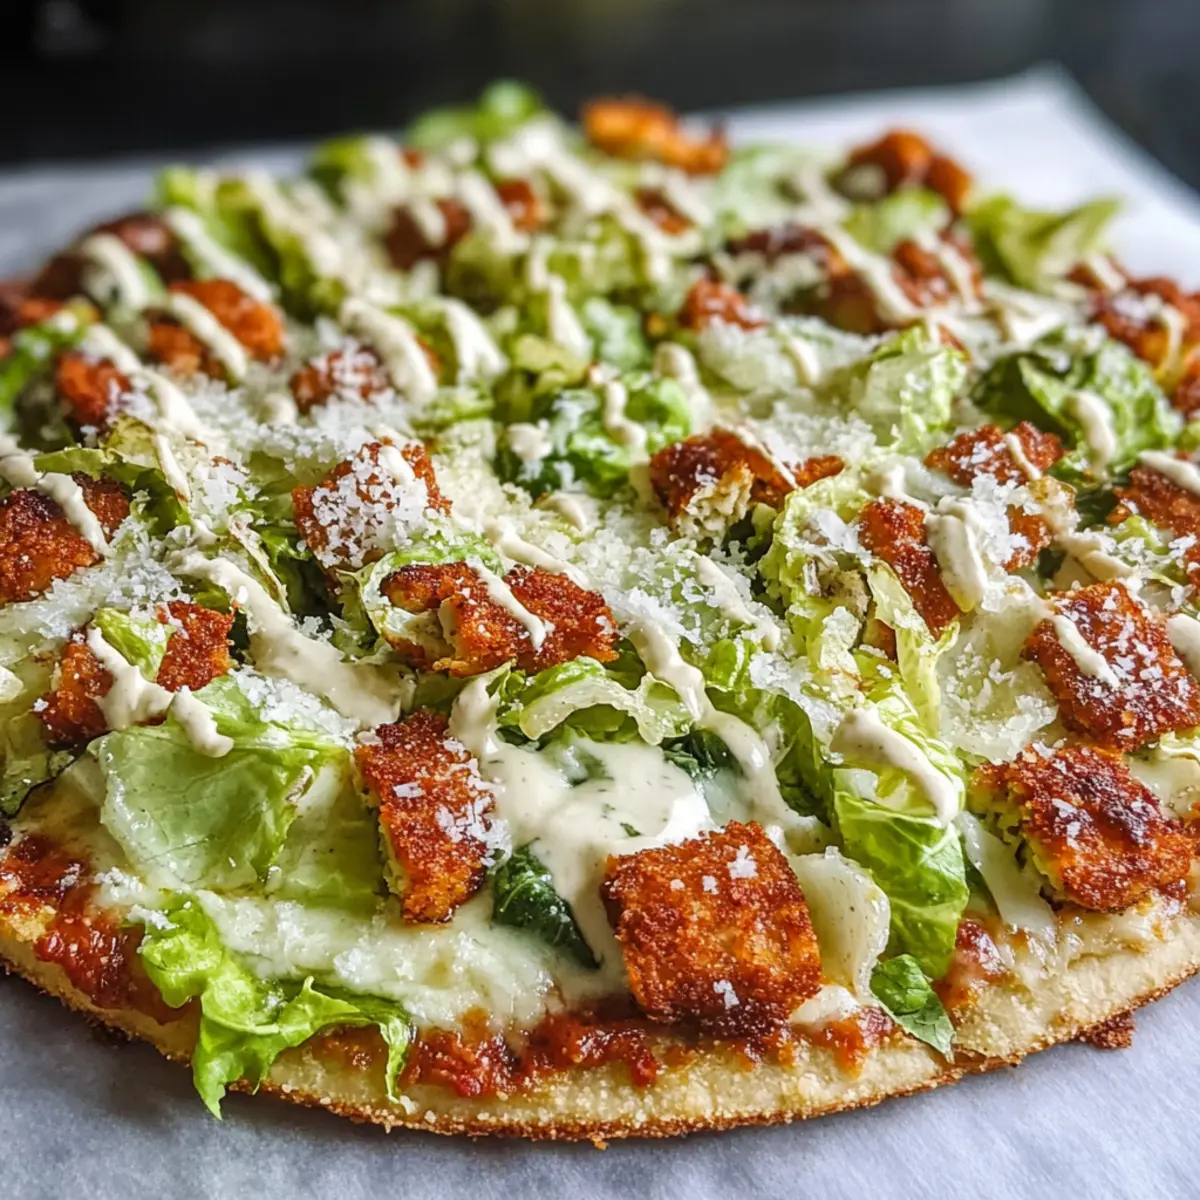
Transfer the chicken mixture onto the parchment-lined baking sheet and shape it into a round crust, approximately 10 to 12 inches wide. Use your hands to flatten and smooth the surface, making sure it’s evenly distributed for an even cook. Visual cues include a slightly raised edge that will help hold the toppings later on.
Step 4: Bake the Chicken Crust
Place the crust in the preheated oven and bake for 20 to 25 minutes. Look for golden brown edges and ensure the center is no longer pink; it should be fully cooked. The Chicken Crust Caesar Salad Pizza base will become crispy and delicious during this time, creating a satisfying texture that complements the fresh toppings.
Step 5: Prepare the Caesar Salad
While the crust is baking, prepare your Caesar salad. In a large bowl, toss chopped romaine lettuce with Caesar dressing and some grated Parmesan cheese. This simple yet vibrant salad will top your Chicken Crust Caesar Salad Pizza, adding freshness and crunch. Set the salad aside while the crust finishes baking.
Step 6: Assemble the Pizza
Once the crust has baked and cooled slightly, it’s time to layer the toppings. Generously top the chicken crust with the prepared Caesar salad mixture. This will not only make your pizza visually appealing but also add a refreshing flavor contrast to the savory chicken base.
Step 7: Add Optional Toppings
For extra flavor, you may add cooked chicken pieces or crispy bacon bits atop the Caesar salad. Drizzle with a bit more Caesar dressing and sprinkle freshly ground black pepper for that finishing touch. These additional ingredients elevate your Chicken Crust Caesar Salad Pizza, creating a delightful medley of flavors.
Step 8: Slice and Serve
Using a sharp knife or pizza cutter, slice the Chicken Crust Caesar Salad Pizza into wedges. Serve immediately while it’s still warm and the crust is crispy, making for a deliciously satisfying meal. Share with family or friends, and enjoy the wonderful fusion of flavors that awaits!
Expert Tips for Chicken Crust Caesar Salad Pizza
-
Mix Thoroughly: Ensure the chicken mixture is well combined to prevent the crust from falling apart when baking.
-
Cooling Time: Allow the crust to cool slightly before adding the salad on top. This helps the toppings adhere better.
-
Check Doneness: Look for golden, crispy edges and a fully cooked center to confirm that the Chicken Crust Caesar Salad Pizza is ready.
-
Season to Taste: Adjust salt and pepper to your preference, enhancing the overall flavor of the chicken crust and salad topping.
-
Experiment with Herbs: Customize the flavor profile by trying different herbs in the crust, maximizing the taste of your pizza!
What to Serve with Chicken Crust Caesar Salad Pizza?
Enhance your meal experience with delightful pairings that perfectly complement this low-carb sensation.
-
Garlic Bread: The buttery, garlic-infused flavor of garlic bread offers a classic Italian touch that balances the freshness of the salad toppings. Perfect for sopping up any extra dressing!
-
Roasted Vegetables: A medley of roasted seasonal veggies such as zucchini, bell peppers, and asparagus adds a colorful, nutritious component that harmonizes beautifully with the flavors of the pizza.
-
Cauliflower Rice: This light, fluffy side brings a mild taste that pairs well with the richness of the chicken crust, ensuring a satisfying low-carb option that keeps the meal wholesome.
-
Crispy Bacon-Wrapped Asparagus: The savory crunch of bacon-wrapped asparagus not only adds texture but also brings a salty element that beautifully complements the chicken base.
-
Mediterranean Quinoa Salad: Bright, zesty flavors from tomatoes, cucumbers, and a lemon vinaigrette provide a refreshing contrast to the hearty pizza while keeping your meal vibrant and nutritious.
-
Sparkling Lemonade: A fizzy, citrusy drink refreshes the palate between bites; its tangy sweetness plays off the savoriness of the chicken crust wonderfully.
Indulge in these pairing options to create a well-rounded, flavorful dining experience that elevates your Chicken Crust Caesar Salad Pizza to new heights!
How to Store and Freeze Chicken Crust Caesar Salad Pizza
- Fridge: Store any leftover Chicken Crust Caesar Salad Pizza in an airtight container in the fridge for up to 3 days. Be sure to separate crust and salad if possible to maintain freshness.
- Freezer: To freeze, wrap individual slices tightly in plastic wrap and place them in a freezer-safe bag for up to 2 months. This ensures the crust stays crispy upon reheating.
- Reheating: When ready to enjoy, reheat slices in the oven at 350°F (175°C) for about 10-15 minutes, until warmed through and the crust regains its crispiness.
- Make-Ahead Tips: Prepare the crust in advance and store it in the fridge for up to 2 days. Simply add the salad toppings before serving for a quick meal!
Chicken Crust Caesar Salad Pizza Variations
Feel free to get creative with your Chicken Crust Caesar Salad Pizza—there’s no limit to how you can personalize this delightful dish!
- Ground Turkey: Substitute ground turkey for a leaner option with slightly different flavors. It’s just as satisfying!
- Cheese Choices: Use low-fat mozzarella or dairy-free cheese alternatives to cater to your dietary needs without sacrificing flavor.
- Greens Galore: Swap romaine for nutrient-packed kale or arugula to boost vitamins while mixing up the crunchy texture in your salad.
- Dressing Switch: Experiment with a creamy ranch or tangy vinaigrette to put a new spin on classic flavors. Homemade is always a hit!
- Topping Extras: Add a burst of color and flavor with cherry tomatoes or crunchy bacon bits—these additions elevate each bite.
- Spice It Up: Drizzle some hot sauce or sprinkle crushed red pepper flakes on top for an extra kick that will awaken your taste buds.
- Herb Variations: Get adventurous by using fresh basil or cilantro in the crust for a pop of freshness and a unique flavor twist.
- Whole Grain Swap: If you’re looking for a heartier base, consider using a whole grain flatbread instead of the chicken crust. It’s a tasty alternative!
For inspiration, don’t forget to check out delightful recipes like Crockpot Balsamic Chicken with Mushrooms for more savory ideas to enhance family meals!
Make Ahead Options
These Chicken Crust Caesar Salad Pizza preparations are a fantastic time-saver for busy weeknights! You can easily prepare the chicken crust up to 24 hours in advance. Simply mix the ground chicken, cheese, egg, and seasonings, then shape it into a crust and bake. Allow it to cool completely before wrapping it tightly in plastic wrap or aluminum foil and refrigerating. When you’re ready to serve, add your Caesar salad toppings and enjoy just as delicious as if made fresh! This method not only reduces cooking time but also ensures you have a satisfying meal ready without any compromise on taste.
Chicken Crust Caesar Salad Pizza Recipe FAQs
What type of ground chicken should I use for the crust?
I recommend using lean ground chicken for a healthier version of this Chicken Crust Caesar Salad Pizza. If you prefer more flavor and moisture, ground turkey or chicken thighs work beautifully. Just keep in mind that chicken thighs might make the crust slightly softer.
How should I store leftover Chicken Crust Caesar Salad Pizza?
To keep your leftovers fresh, store any uneaten Chicken Crust Caesar Salad Pizza in an airtight container in the fridge for up to 3 days. If possible, separate the crust from the salad to help maintain its crispness. This way, when you’re ready to enjoy leftovers, your crust will still have that delightful crunch!
Can I freeze the Chicken Crust Caesar Salad Pizza?
Absolutely! To freeze your Chicken Crust Caesar Salad Pizza, wrap individual slices tightly in plastic wrap, then place them in a freezer-safe bag. It can be stored in the freezer for up to 2 months. When you’re ready to indulge, reheat in the oven at 350°F (175°C) for about 10-15 minutes, ensuring that the crust regains its crispy texture.
What can I do if my chicken crust is falling apart?
If your chicken crust is falling apart, it could be due to not mixing the ingredients thoroughly or not allowing the crust to cool slightly before adding toppings. Ensure you mix the ingredients until fully combined, and after baking, let the crust cool for about 5 minutes—this will help the toppings stick better!
Could I make this recipe suitable for a dairy-free diet?
Yes, definitely! For a dairy-free version of the Chicken Crust Caesar Salad Pizza, simply substitute the shredded mozzarella and Parmesan cheese with plant-based cheeses. There are excellent vegan cheese options available that can replicate the gooeyness and flavor quite well!
How long can I keep the chicken crust mixture before baking?
I suggest baking the chicken crust mixture right after mixing for the best results. However, if you need to prepare it in advance, you can refrigerate the mixture for up to 24 hours. Just make sure it is stored in an airtight container to prevent any contamination or drying out.
Delicious Chicken Crust Caesar Salad Pizza for a Guilt-Free Treat
Ingredients
Equipment
Method
- Preheat your oven to 400°F (200°C) and line a baking sheet with parchment paper.
- In a large mixing bowl, combine ground chicken, shredded mozzarella, Parmesan cheese, egg, Italian herbs, garlic powder, salt, and pepper. Mix until fully incorporated.
- Transfer the chicken mixture onto the parchment-lined baking sheet and shape into a round crust approximately 10 to 12 inches wide.
- Place the crust in the preheated oven and bake for 20 to 25 minutes until golden brown and fully cooked.
- While the crust is baking, prepare your Caesar salad by tossing chopped romaine lettuce with Caesar dressing and some grated Parmesan cheese.
- Once the crust has baked and cooled slightly, generously top it with the prepared Caesar salad mixture.
- For extra flavor, add cooked chicken pieces or crispy bacon bits on top and drizzle with more Caesar dressing.
- Slice the Chicken Crust Caesar Salad Pizza into wedges and serve immediately while it’s warm.
Leave a Reply