
As I sifted through my pantry, the aroma of melting chocolate began to weave through the air, transporting me back to simpler times. There’s nothing quite like biting into a freshly baked Chocolate Chip Cookie, where the soft, chewy texture melds perfectly with the sweet, gooey pockets of chocolate. This Ultimate Classic Chocolate Chip Cookies recipe is not just another baking project; it’s a chance to transform your kitchen into a warm haven sweetened with nostalgia. With quick prep time and the ability to satisfy any sweet tooth, these cookies are the ultimate crowd-pleaser—perfect for sharing or keeping all to yourself! Ready to create magic in your oven? Let’s dive into the delicious world of homemade cookies that will have everyone asking for seconds!
Why Are Homemade Cookies So Irresistible?
Warm, Nostalgic Vibes: There’s something special about the aroma of freshly baked cookies wafting through the home, evoking childhood memories and family gatherings.
Simple Ingredients: Made with pantry staples, this recipe is accessible for bakers of all levels, ensuring you can whip up a batch anytime.
Customizable Fun: From classic chocolate chips to oatmeal or peanut butter variations, you can tweak this recipe to suit any taste.
Perfect for Sharing: Ideal for parties, family dinners, or cookie swaps, these cookies are sure to win hearts and taste buds alike.
Quick Prep Time: In just 30 minutes, you’ll have warm, gooey cookies ready to enjoy, making it a perfect last-minute treat.
Pair these delights with a glass of milk or one of our savory meals like Ground Turkey Zucchini Skillet, and you’ll have a cozy dining experience that everyone will adore!
Chocolate Chip Cookie Ingredients
• Whip up the ultimate treat with these simple ingredients!
For the Dough
- Unsalted Butter – Adds richness and moisture; for a dairy-free version, use coconut oil.
- Granulated Sugar – Contributes sweetness and a crispy outer layer; can substitute with coconut sugar for a lower glycemic option.
- Brown Sugar – Provides moisture and depth of flavor through caramelization; light or dark variations work well interchangeably.
- Eggs – Binds ingredients together; use flax eggs for a vegan alternative.
- Vanilla Extract – Enhances flavor; pure extract is preferred for the best taste but imitation can be used in a pinch.
- All-Purpose Flour – Offers structure; swap for whole wheat flour to introduce a nuttier flavor.
- Baking Soda – A leavening agent that aids in rising; do not substitute with baking powder.
- Salt – Balances sweetness and enhances flavors; can be reduced or replaced with sea salt for a milder taste.
For the Chocolate
- Semi-Sweet Chocolate Chips – The star of the show; experiment with milk chocolate or dark chocolate depending on your preference.
Get ready to enjoy baking these incredible cookies that will fill your home with love and warmth.
Step‑by‑Step Instructions for Ultimate Classic Chocolate Chip Cookies
Step 1: Preheat Your Oven
Begin by preheating your oven to 350°F (175°C) to ensure the perfect baking environment for your ultimate classic chocolate chip cookies. This temperature will help the cookies achieve a soft, chewy center with lightly golden edges. While your oven preheats, line two baking sheets with parchment paper for easy cleanup later.
Step 2: Cream the Butter and Sugars
In a large mixing bowl, combine 1 cup of unsalted butter, 3/4 cup granulated sugar, and 3/4 cup brown sugar. Using an electric mixer, beat these ingredients together on medium speed for about 3-5 minutes until the mixture is light, fluffy, and well-combined. This creaming process is crucial for achieving that tender texture, which is a hallmark of classic chocolate chip cookies.
Step 3: Incorporate Eggs and Vanilla
Once your butter and sugar are fluffy, add in 2 large eggs, one at a time, mixing well after each addition to fully incorporate them into the mixture. Follow with 2 teaspoons of vanilla extract—this will enhance the flavor of your cookies beautifully. Continue mixing until everything is smoothly blended and you can no longer see any traces of egg.
Step 4: Mix the Dry Ingredients
In a separate bowl, whisk together 2 1/4 cups all-purpose flour, 1 teaspoon baking soda, and 1/2 teaspoon salt. This step ensures your dry ingredients are well-combined, promoting even distribution throughout the dough. Gradually add this dry mixture to your wet ingredients, mixing on low speed until just combined; be careful not to overmix, as this can lead to tough cookies.
Step 5: Fold in the Chocolate Chips
Now, it’s time for the star of the show! Gently fold in 2 cups of semi-sweet chocolate chips using a spatula, making sure they are evenly distributed throughout the cookie dough. You’ll know it’s ready when you see pockets of chocolate chips peeking out from the thick dough, enticing you to take a bite right away.
Step 6: Scoop the Dough onto Baking Sheets
Using a tablespoon or cookie scoop, drop rounded balls of dough onto the lined baking sheets, spacing them about 2 inches apart. This allows room for the cookies to spread as they bake and ensures that they won’t stick together. You should have about 24 dough balls ready to go into the oven, eagerly waiting to transform into warm delights.
Step 7: Bake the Cookies
Place your baking sheets in the preheated oven and bake for 10-12 minutes. Keep a close watch for the edges to turn golden brown while the centers should appear slightly soft. This is the ideal moment to take them out for that perfect chewy texture. If they look puffy, that’s normal, and they’ll settle while cooling.
Step 8: Cool and Enjoy
Once baked, allow the cookies to cool on the baking sheets for about 5 minutes before transferring them to a wire rack to cool completely. This cooling step is vital as it helps set the cookies, resulting in a chewy center and ensuring they’re just the right temperature when you take your first bite of your ultimate classic chocolate chip cookies.

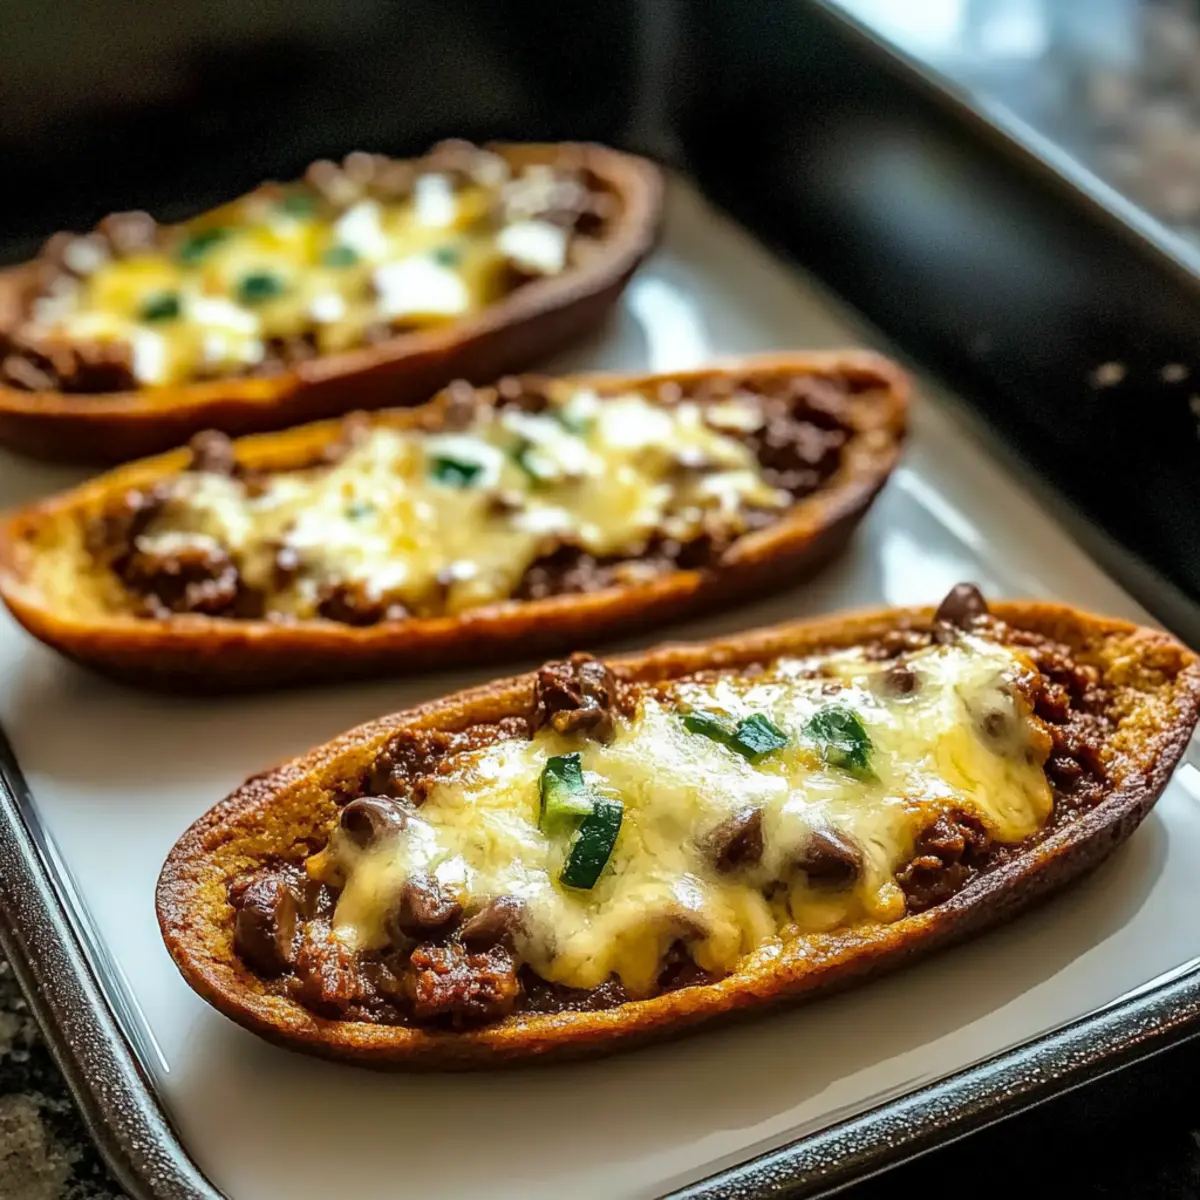
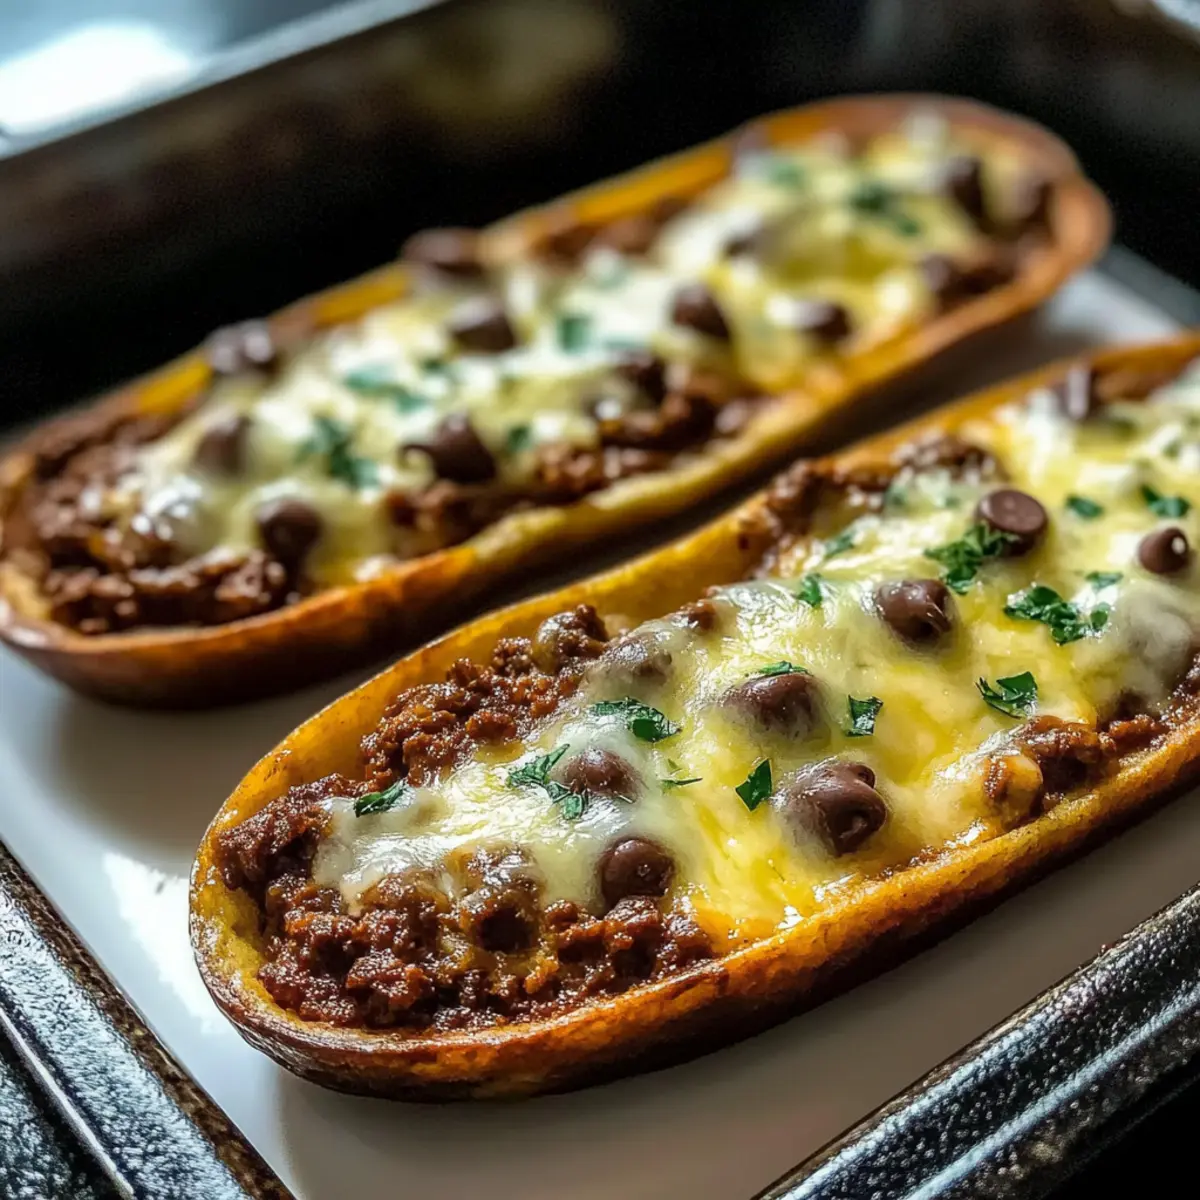
Ground Beef Zucchini Boats Variations
Invite your creativity to shine with these delightful twists on our savory zucchini boats. The beautiful thing about this recipe is its adaptability!
-
Beef Substitute: Use ground turkey or chicken for a leaner option, while still keeping that savory flavor intact. These swaps make it a lighter meal without sacrificing taste.
-
Spicy Kick: Add a pinch of red pepper flakes or diced jalapeños to the beef mixture for a zesty burn that brings excitement to every bite. If you love heat, this variation will elevate your dinner experience.
-
Vegetarian Delight: Swap the beef for cooked quinoa or lentils, mixing in the same seasonings for a hearty, plant-based version. You’ll enjoy every delicious spoonful, packed with flavor and texture.
-
Cheesy Goodness: Incorporate shredded cheese into the beef mixture before stuffing the zucchini halves, or top with extra cheese before baking for an irresistible cheesy crust. Who can resist gooey melted cheese?
-
Herb Infusion: Mix in fresh herbs like basil, parsley, or cilantro to the beef filling for a refreshing taste. These herbs not only enhance the flavor but also add a pop of color to your dish.
-
Mediterranean Twist: Add diced tomatoes, olives, and feta cheese to the beef filling for a delicious Mediterranean-inspired version. Pair these flavors with a fresh salad for a complete meal you’ll adore.
-
Stuffed Variations: Instead of zucchini, try using bell peppers or eggplant as the vessel—each brings its unique taste and texture, offering a fun spin on the classic dish.
These variations make our Ground Turkey Zucchini Skillet and Style Ground Beef even more versatile! Enjoy customizing your zucchini boats to suit your family’s preferences!
What to Serve with Ultimate Classic Chocolate Chip Cookies?
Imagine treating your loved ones to freshly baked cookies while pairing them with delightful sides that enhance every bite and elevate your dessert experience.
-
Creamy Vanilla Ice Cream: The coolness of ice cream perfectly contrasts the warm cookies, creating a dreamy combo everyone will adore.
-
Rich Hot Chocolate: A steaming cup of hot chocolate takes cozy indulgence to the next level, making every bite of the cookie even sweeter.
-
Freshly Brewed Coffee: The bold, bright flavors of coffee cut through the sweetness, making it an ideal partner for your chocolatey treats.
For a refreshing twist, consider serving alongside a light fruit salad. The juicy, fresh notes from fruits will cleanse the palate, allowing you to savor the sweet richness of the cookies even more.
-
Milk or Nut Milk: The classic pairing of cookies and milk never gets old. Whether it’s whole milk or almond milk, the creamy textures meld beautifully with warm, gooey chocolate.
-
Chocolate-Dipped Strawberries: Elevate your dessert game! The luscious berries add a touch of class and provide a fruity balance to the rich chocolate cookies.
Tips for the Best Chocolate Chip Cookies
Chewy Texture: Don’t overmix the dough after adding the flour. This helps maintain the soft, chewy texture that everyone loves.
Chilling Dough: For extra-flatter cookies, remember to chill the dough for at least 30 minutes before baking. This controls spreading.
Baking Time Variation: Adjust your baking time based on cookie size. Larger cookies will need a bit longer, so keep an eye on them!
Quality Ingredients: Invest in high-quality chocolate chips; the flavor impact can elevate your chocolate chip cookies from good to irresistible.
Room Temperature Ingredients: Make sure your ingredients, especially butter and eggs, are at room temperature for better emulsification and texture.
How to Store and Freeze Chocolate Chip Cookies
Room Temperature: Store cookies in an airtight container for up to 1 week to retain moisture and softness. Keep them away from direct sunlight for best results.
Fridge: For extra freshness, you can refrigerate cookies in a sealed container for up to 2 weeks. Just remember to let them come to room temperature before indulging!
Freezer: For longer storage, freeze cookies in a single layer on a baking sheet. Once firm, transfer them to a freezer bag. They can last up to 3 months!
Reheating: When ready to enjoy, warm the cookies in a 350°F (175°C) oven for 5-7 minutes. They’ll regain their soft, gooey texture, inviting you back for more of that delicious chocolate chip goodness.
Make Ahead Options
These Ultimate Classic Chocolate Chip Cookies are perfect for busy home cooks looking to save time! You can prepare the cookie dough up to 24 hours in advance by mixing all the components together and refrigerating it in an airtight container. This keeps the dough fresh and enhances the flavors as it rests. When you’re ready to bake, simply scoop and place the chilled dough on baking sheets, letting it sit at room temperature for about 10-15 minutes before baking. For longer storage, you can freeze the rolled dough balls for up to 3 months; just bake straight from the freezer, adding a couple of extra minutes to the baking time. This way, you’ll always have delicious, homemade cookies ready with minimal effort!

Chocolate Chip Cookies Recipe FAQs
How do I choose the best chocolate for my cookies?
Absolutely! For the best flavor, I recommend using high-quality semi-sweet chocolate chips, but feel free to experiment with milk chocolate or dark chocolate to suit your taste. Look for chocolate that has a high cocoa content for a richer flavor, and always choose brands you enjoy eating straight out of the bag!
How long can I store my chocolate chip cookies?
You can store your chocolate chip cookies in an airtight container at room temperature for up to 1 week. This ensures they stay soft and moist. If you want them to last even longer, I suggest refrigerating them, which can keep them fresh for up to 2 weeks. Just allow them to come back to room temperature before devouring!
Can I freeze chocolate chip cookies?
Definitely! To freeze chocolate chip cookies, start by placing them in a single layer on a baking sheet and freeze until firm. After that, transfer the cookies into a freezer bag or airtight container. They can last up to 3 months in the freezer. When you’re ready to enjoy, simply reheat them in a 350°F (175°C) oven for about 5-7 minutes for that fresh-out-of-the-oven taste!
What should I do if my cookies turn out too flat?
Very often, flat cookies can be a result of over-mixing the dough or not chilling it long enough. If this happens, the next time consider chilling your dough in the refrigerator for at least 30 minutes. You can also try adding a tiny bit more flour—about 2 tablespoons—as this can help increase structure and prevent spreading.
Can I substitute any ingredients for dietary needs?
Of course! If you’re looking to make these cookies dairy-free, swap the unsalted butter with coconut oil or a plant-based butter. For a vegan version, simply use flax eggs (1 tablespoon ground flaxseed mixed with 3 tablespoons water for each egg) in place of regular eggs. Feel free to use gluten-free flour blends as well if you’re avoiding gluten.
How do I prevent my cookies from being tough?
To keep your cookies soft and chewy, avoid overmixing after you add the flour. It’s also essential to cream the butter and sugars properly until light and fluffy, which helps incorporate air into the mixture, yielding a light texture. Lastly, watch your baking time closely—overbaking can lead to hard cookies!
Savory Ground Beef Zucchini Boats for Delicious Family Meals
Ingredients
Equipment
Method
- Preheat your oven to 375°F (190°C).
- Prepare the zucchini by halving them and removing the insides to create boats.
- In a pan, cook the ground beef over medium heat until browned. Drain excess fat.
- Add tomato sauce, Italian seasoning, salt, and pepper to the beef and stir to combine.
- Fill the zucchini boats with the beef mixture and top with shredded cheese.
- Place the filled zucchini boats on a baking sheet and bake for 25 minutes until the zucchini is tender.
- Remove from the oven and allow to cool slightly before serving.
Leave a Reply